
How to Use an Avent Bottle Warmer: A Practical Guide
Using an Avent bottle warmer is a simple, effective way to ensure your baby's milk is perfectly heated. Just add water, place the bottle inside, and select the setting that corresponds to the milk volume. The warmer gently and evenly heats the milk, and an indicator light lets you know when it’s ready. It's an invaluable tool for parents.
Getting Started With Your Avent Bottle Warmer
Bringing home new baby equipment can feel daunting, but the Avent bottle warmer is designed to simplify your routine, especially during late-night feedings. It's a key item you'll be glad to have on your essential baby items list.
The primary benefit of this device is its ability to eliminate the guesswork in warming a bottle. You no longer need to run a bottle under hot water and estimate the temperature. The warmer provides a consistent temperature every time, which is essential for preserving the nutrients in breast milk or formula that can be damaged by excessive heat.
Unboxing and Identifying Parts
When you open the box, you will find a straightforward design with minimal components:
- The main warming unit
- A lift-out basket for smaller bottles and baby food jars
- The instruction manual
Examine the main dial; it is the sole control. The settings correspond to the volume of milk in the bottle, not a specific temperature. This intelligent design ensures that whether you're warming a 4 oz bottle or a 6 oz one, both reach the same optimal, baby-ready temperature.
The popularity of these devices is well-founded. The global market for baby bottle warmers and sterilizers was valued at approximately USD 185.4 million and continues to grow. North America accounts for 40.4% of this market, demonstrating how many parents depend on these tools for safe and efficient feedings.
Choosing the Right Setting for Perfect Temperature
Achieving the correct bottle temperature is vital for protecting the nutritional integrity of your baby's milk. The Avent warmer is designed to prevent overheating, ensuring every feeding is safe and healthy. The key to success lies in understanding the control dial.
Instead of a simple timer, the settings are based on the volume of milk in the bottle. This feature means that whether you are preparing a small 2-ounce feeding or a full 6-ounce meal, the final temperature will be appropriate. Simply turn the dial to the setting that matches the amount of milk.
This infographic provides a visual guide to help you select the correct setting quickly.
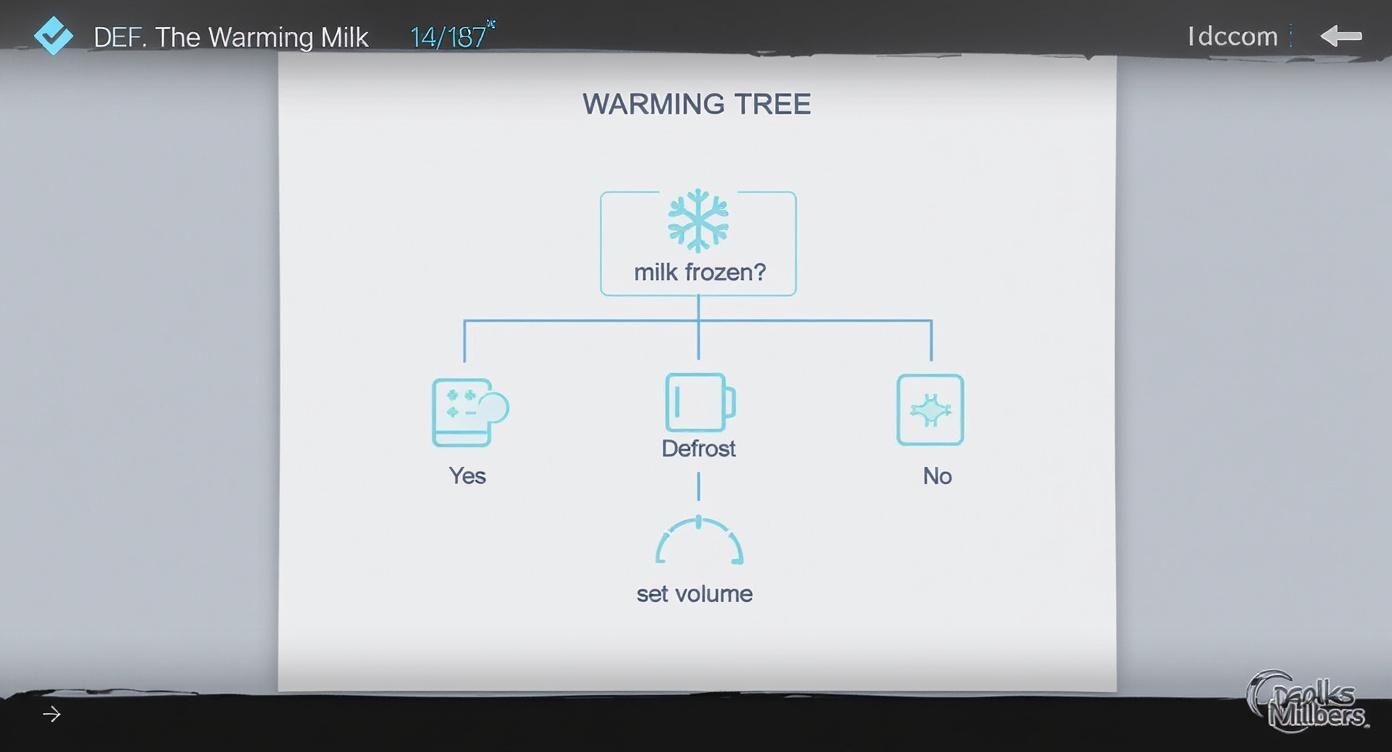
As shown, the first factor to consider is whether you are starting with refrigerated or frozen milk. From there, adjust the setting based on the volume.
Navigating Different Milk States
The initial state of the milk—refrigerated, frozen, or room temperature—will affect the warming process. The warmer has specific settings to accommodate each state, protecting the milk's quality.
- Chilled Milk from the Fridge: This is the most common setting. Select the option that matches the milk volume for a gentle warming cycle that takes just a few minutes.
- Frozen Milk or Baby Food: Use the dedicated defrost setting for this purpose. It uses a lower, gentler heat to thaw milk or food safely, preventing hot spots and preserving nutrients that high heat can destroy.
- Room Temperature Milk: If you have a bottle that's already at room temperature, you will still use the volume-based settings, but the warming time will be considerably shorter.
A common error is attempting to speed up the process by choosing a higher volume setting for a smaller bottle. This can lead to overheating, which can degrade essential proteins and vitamins in breast milk. Always match the setting to the actual amount of milk.
This focus on precise temperature control is part of a larger trend in baby products. The global demand for intelligent, multi-functional devices is increasing, with the Asia Pacific region comprising over 22% of the baby bottle warmer market. This growth underscores how much modern parents value technology that supports safe feeding practices. You can discover more about these market trends and their drivers to learn more.
Mastering these settings will help integrate the warmer into your daily routine, which is fundamental for a predictable feeding schedule. A properly warmed bottle can be invaluable, especially during early morning feedings. For additional organizational support, our baby feeding schedule template is an excellent resource.
Essential Safety Practices Every Parent Should Know

When attending to a hungry baby, it's easy to rush, but following a few key safety practices will provide peace of mind with every feeding. These are non-negotiable guidelines for using the Avent bottle warmer safely.
First, always use fresh water for each warming cycle. Reusing water can lead to bacterial growth or mineral buildup. Fresh water ensures a clean, hygienic start every time.
Be mindful of the warmer's placement. It should be on a flat, stable surface where it cannot be easily knocked over. Crucially, keep it well out of the reach of children. The water becomes hot, so preventing accidental spills is essential for a safe environment. This is one aspect of creating a secure space for your child, a topic we cover in our guide on how to childproof your home.
Avoiding Common Safety Missteps
One of the most common mistakes is allowing the warmer to operate without water. This can damage the heating element and pose a fire hazard. Always add water before plugging in and turning on the unit.
The most critical safety check occurs just before feeding: always test the milk’s temperature. Gently swirl the bottle (do not shake, as this can create air bubbles) and sprinkle a few drops on the inside of your wrist. This classic, reliable method ensures the milk is at a safe temperature and free of hot spots.
Regarding water type, it is best to avoid using softened water. The salts can accelerate mineral deposits inside the warmer. Standard tap water or filtered water is the recommended choice for maintaining the appliance's longevity.
Finally, establish the habit of unplugging the warmer as soon as you are finished using it. This simple step eliminates any potential risk when the appliance is not in active use. By incorporating these practices into your routine, you can warm every bottle with confidence and safety.
Keeping Your Avent Warmer Clean and Efficient
A clean warmer is an effective one, and regular maintenance is key to ensuring your Avent device functions correctly. Consistent cleaning prevents bacterial growth and mineral buildup, which can impair performance.
Fortunately, this is not a time-consuming task. For daily upkeep, wiping the exterior with a damp cloth is typically sufficient to handle spills and keep the unit clean.
The rise of e-commerce has made it easier for parents to access high-quality baby products like the Avent bottle warmer. Online platforms provide access to user reviews and detailed guides, empowering you to use and maintain your products correctly. If you're interested in how these trends are shaping the market, you can explore more insights on the baby product industry.
How to Descale Your Warmer
Over time, you may notice a white, chalky residue inside the warmer. This is limescale, a harmless mineral deposit from tap water. If left to accumulate, it can increase heating times and reduce efficiency.
The process of removing it is called "descaling." Before you begin, always unplug the warmer and allow it to cool completely.
As a general guideline, aim to descale your Avent warmer approximately every four weeks. If you live in an area with hard water, you may need to do this every two weeks to maintain optimal performance.
Here is the simple descaling procedure:
- Prepare the cleaning solution. Combine one part white vinegar with two parts cold water. For most units, a mixture of 2 ounces of vinegar and 4 ounces of water is sufficient.
- Pour and soak. Pour the solution directly into the warmer's chamber and let it sit until the limescale has completely dissolved.
- Rinse thoroughly. Discard the solution and rinse the chamber several times with fresh tap water to remove any residual vinegar odor or taste.
Wipe the interior and exterior with a soft cloth, and the process is complete. Your warmer will be clean, efficient, and ready for the next use.
Troubleshooting Common Avent Warmer Issues
Even the most dependable baby products can encounter occasional issues. If your Avent bottle warmer is not functioning as expected, do not worry. Most problems can be resolved quickly with simple troubleshooting.
A common issue is the warmer failing to turn on. Before assuming a malfunction, check the power cord to ensure it is securely plugged into a working outlet. Also, verify that the main unit is properly seated on its base, as a loose connection can interrupt power.
Another frequent problem is a blinking indicator light that does not become solid. This is typically the warmer's alert that the water level is incorrect. The internal sensors require a specific amount of water to operate, so a flashing light usually indicates an empty or overfilled chamber.
Solving Temperature Troubles
The primary function of a bottle warmer is to heat milk to an ideal temperature. If it comes out too hot or too cold, it is often due to an incorrect setting.
-
Milk is Too Cold: This is typically caused by insufficient water in the chamber or selecting a setting for less milk than is in the bottle. Check that the water level is correct and that the dial is set to the exact volume of milk you are warming.
-
Milk is Too Hot: This usually occurs when you select a setting for a larger volume of milk than what is in the bottle. For example, using the 6 oz setting for a 4 oz bottle will result in overheating. Always be precise and match the setting to the milk volume.
For consistent temperature results, try filling the warmer with room-temperature water instead of cold water from the tap. This provides a more stable starting point for the heating cycle and often leads to a more accurate final temperature.
Got Questions? We’ve Got Answers.
When you're navigating parenthood on little sleep, questions about new baby gear are inevitable. Here are answers to some of the most common inquiries about the Avent bottle warmer.
Can I Use My Glass Bottles in the Avent Warmer?
Yes, the Philips Avent bottle warmer is designed to be compatible with both plastic and glass bottles.
It works with the entire line of Avent products and is also suitable for most other major bottle brands. Ensure the bottle fits comfortably within the chamber without being too tight.
How Long Can I Leave a Bottle in There After It's Warmed?
Once the warming cycle is complete, you should remove the bottle promptly. Even if your model includes a "keep warm" function, it is not recommended to let milk sit in the warmer for an extended period.
For both safety and nutritional reasons, formula and breast milk should be served immediately after warming. Once a bottle has been heated, it should not be reheated.
A practical rule is to only warm the amount of milk your baby is likely to consume in a single feeding. This practice minimizes waste and ensures that every feeding is fresh and nutritious.
Is Distilled Water Really Necessary?
While not strictly necessary, using distilled or filtered water is highly recommended. Tap water contains minerals that can lead to limescale buildup on the appliance's heating element.
Using distilled water significantly reduces limescale accumulation, which helps the warmer maintain its efficiency and heating accuracy. This simple step can extend the life of the machine and reduce the frequency of descaling.
Can It Handle Frozen Breast Milk Bags?
Yes, the Avent warmer is designed to safely thaw frozen breast milk bags directly in the chamber.
Be sure to use the dedicated defrost setting. This feature gently thaws the milk before warming it, which is essential for preserving the vital nutrients and antibodies present in breast milk.
Ready to make feeding time a little less stressful? Check out the full range of baby essentials at MiniPrecious and find the right gear for your family. Shop now at https://miniprecious.com.
